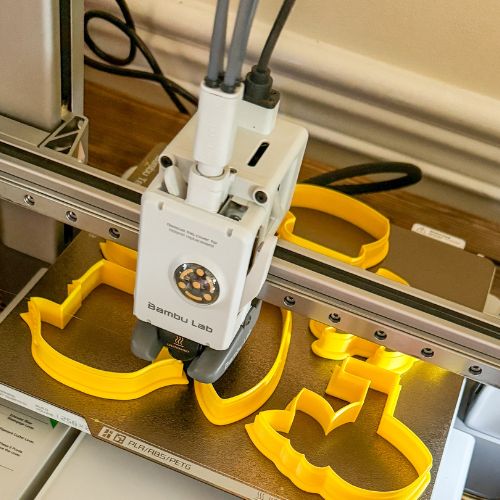
How Cookie Cutters Are Made
Cookie cutters are a staple in any baker's kitchen, especially when it comes to creating custom cookies for special occasions. But have you ever wondered how these delightful tools are made? In this blog post, I'll take you through the detailed process of creating custom cookie cutters from start to finish.
Step 1: Design Concept
The journey of making a cookie cutter begins with the design concept. We either draw or purchase clip art for the designs we want to create. It's essential to choose designs that will translate well into cookie cutters, ensuring they are both visually appealing and functional.
Step 2: Modifying the Design
Once we have the initial design, we use the Procreate program on an iPad to modify the clip art. This step is crucial as it ensures that the design will make for a good cookie cutter. For instance, we avoid super narrow openings in the design, as they would make it difficult to cut the dough effectively.
Step 3: Creating a 3D Model
With the modified design ready, we import it into Fusion 360, a 3D modeling program. Here, we transform the 2D design into a 3D model of a cookie cutter. During this stage, we incorporate features like wider rims (comfort handles) to make it easier on your hands when cutting dough, and double-thick cutting walls to prevent the cutters from splitting during use.
Step 4: Finalizing the Design
We also ensure that our cookie cutters are over 1/2 inch deep. This depth allows you to cut dough of various thicknesses, making the cutters versatile for different baking needs. Once the design is finalized, we review it thoroughly to make any necessary adjustments.
Step 5: Exporting the Design
Next, we export the 3D model as an STL file from Fusion 360. This file format is essential for 3D printing and allows us to save the design on our computer, ready for the next step in the process.
Step 6: 3D Printing the Cookie Cutters
We then upload the STL file to the cloud and send it to our 3D printers. We use printers from Bambu Labs, which are known for their reliability and precision. For the material, we use food-safe filament to ensure that the cookie cutters are safe to use with food.
Step 7: Post-Printing Process
After printing, the cookie cutters need to be washed by hand. The filament we use melts at high temperatures, so they are not dishwasher safe. This final step ensures that the cookie cutters are clean, safe, and ready for use. Using Dishwasher safe filament could significantly raise the price of the end product and we want to make our cookie cutters available to everyone at the most reasonable price.
Conclusion
From the initial design concept to the final product, making cookie cutters is a meticulous process that combines creativity, technology, and craftsmanship. Next time you use a custom cookie cutter, you'll know the detailed work that goes into creating these essential baking tools. Explore our collection of custom cookie cutters and see the magic for yourself. Happy baking!
Feel free to tag us on social media with your cookie creations. We love seeing how our products bring joy and creativity to your baking adventures.


1 comment
This step by step breakdown is very helpful. I will refer back to it several more times. I am planning on purchasing a 3D printer soon this will help me to know what the next step to follow.
Leave a comment